NextCoud 是一款开源(免费)软件,属于 OwnCloud的一个分支。NextCloud是基于
PHP及Javascript开发,支持MySQL/MariaDB,PostgreSQL,Oracle,SQLite等主流数据库。与此同时,NextCloud提供了桌面版(Windows,Mac, Linux),手机版(IOS,Android)应用,极大了方便了用户的使用。
本文将主要介绍在 CentOS 6.* 环境下,安装 NextCloud 12。
近期,在捣鼓一台CentOS服务器,在加上领导想在部门内部搭建一个类似网盘的工具软件,就自己做了一些调研,对比之后选择了NextCloud。网上好多教程都是基于CentOS 7的,相对来说坑会少一些,本文也参考了部分内容。
搭建环境
- CentOS 6.* 64-bit
- Root权限
- PHP > 7.0
- 服务器:Nginx(👍),Apache(😒,试验过,太慢,放弃了)
安装Nginx 及 PHP7-FPM
网上大部分教程使用的都是Apache,我自己也试过(真的慢),但在用Nginx后,使用体验提升了一个档次。
在安装之前,须添加EPEL的Repo
|
|
安装 Nginx
|
|
安装PHP7-FPM
如果之前安装过PHP,请检查PHP的版本:php -v ,也可以卸载之前的版本:yum remove php* php-common
添加PHP7的yum源:
|
|
修正yum源:
|
|
将remi段中的enabled=0改为enabled=1。
|
|
与remi.repo类似,将remi-php70段中的enabled=0改为enabled=1。
扫行命令查看版本如果显示的是7.x的话 那就没问题
|
|
接下来,安装PHP7-FPM以及PHP附加组件:
|
|
最后,检查PHP的版本:
|
|

配置 PHP7-FPM
接下来配置PHP7-FPM,使其以nginx用户运行,并监听 9000端口。
修改配置文件
1vim /etc/php-fpm.d/www.conf修改用户及组,改为 nginx

确认PHP-FPM监听
9000端口
去除以下注释,激活PHP-FPM的系统环境变量

保存,退出
在
/var/lib目录下为php的session创建文件夹,并将所有者设置为nginx。(目前,我也不知道这一步是做啥的)启动nginx与php-fpm
12service nginx startservice php-fpm start
安装 MariaDB
添加MariaDB 源,在创建
MariaDB.repo,文件内容可以参考:link,但是对于400多MB的文件来说,7,8K的速度也是怪可怜的。以下是一个国内镜像服务器的配置:12345[mariadb]name = MariaDBbaseurl = http://mirrors.ctyun.cn/MariaDB/yum/10.1/centos6-amd64gpgkey=http://mirrors.ctyun.cn/MariaDB/yum/RPM-GPG-KEY-MariaDBgpgcheck=1安装:
1yum install MariaDB-server MariaDB-client启动
1sudo /etc/init.d/mysql start配置MariaDB
- 数据库设置
12345678910111213141516171819202122232425262728293031323334353637[MariaDB Secure installation]$ sudo mysql_secure_installationNOTE: RUNNING ALL PARTS OF THIS SCRIPT IS RECOMMENDED FOR ALL MariaDBSERVERS IN PRODUCTION USE! PLEASE READ EACH STEP CAREFULLY!Enter current password for root (enter for none): Press EnterOK, successfully used password, moving on...Set root password? [Y/n] yNew password:Re-enter new password:Password updated successfully!Reloading privilege tables..... Success!Remove anonymous users? [Y/n] y... Success!Disallow root login remotely? [Y/n] y... Success!Remove test database and access to it? [Y/n] y- Dropping test database...... Success!- Removing privileges on test database...... Success!Reload privilege tables now? [Y/n] y... Success!Cleaning up...All done! If you've completed all of the above steps, your MariaDBinstallation should now be secure.Thanks for using MariaDB!- 数据初始化
1234567891011121314$ sudo mysql -u root -pEnter password: ******MariaDB [(none)]> create database nextcloud_db;Query OK, 1 row affected (0.01 sec)MariaDB [(none)]> GRANT ALL PRIVILEGES ON nextcloud_db.* TO 'nextcloud_user'@'localhost' IDENTIFIED BY '12345';Query OK, 0 rows affected (0.01 sec)MariaDB [(none)]> FLUSH PRIVILEGES;Query OK, 0 rows affected (0.00 sec)MariaDB [(none)]> exitBye
安装 SSL 证书文件
(个人认为,此步可选)可以参考:这篇文章中的Step4
下载和安装 NextCloud
访问以下网址:Nextcloud,点击
Download下载代码文件。解压文件,并移动到
/usr/share/nginx/html/12unzip nextcloud-10.0.2.zipmv nextcloud/ /usr/share/nginx/html/移动到 nginx web应用的根目录:
//usr/share/nginx/html/,创建/data文件夹,并将文件夹权限设置为nginx:nginx123cd /usr/share/nginx/html/mkdir -p nextcloud/data/chown nginx:nginx -R nextcloud/
配置Nginx & SELinux
进入
/etc/nginx/conf.d/,创建文件nextcloud.conf,并写入以下内容。(注:这里nextCloud 官网有关于 nginx的配置文档,在试验过程中,加入了SSL证书,发现一些小问题,特别是所有请求强制转发到
Https,一直有问题。在一顿Google之后,终于可以跳转了。)123456789101112131415161718192021222324252627282930313233343536373839404142434445464748495051525354555657585960616263646566676869707172737475767778798081828384858687888990919293949596979899100101102103104105106107108109110111112113114115116117118119120121122123124125126127128129130upstream php-handler {server 127.0.0.1:9000;}server {listen 80 default_server;listen [::]:80 default_server;server_name _;# enforce httpsreturn 301 https://$host$request_uri;}server {listen 443 ssl;server_name cloud.example.com;ssl_certificate /etc/nginx/cert/nextcloud.crt;ssl_certificate_key /etc/nginx/cert/nextcloud.key;# Add headers to serve security related headers# Before enabling Strict-Transport-Security headers please read into this# topic first.add_header Strict-Transport-Security max-age=15768000;# includeSubDomains; preload;";add_header X-Content-Type-Options nosniff;add_header X-XSS-Protection "1; mode=block";add_header X-Robots-Tag none;add_header X-Download-Options noopen;add_header X-Permitted-Cross-Domain-Policies none;# Path to the root of your installationroot /usr/share/nginx/html/;location = /robots.txt {allow all;log_not_found off;access_log off;}# The following 2 rules are only needed for the user_webfinger app.# Uncomment it if you're planning to use this app.# rewrite ^/.well-known/host-meta /nextcloud/public.php?service=host-meta# last;#rewrite ^/.well-known/host-meta.json# /nextcloud/public.php?service=host-meta-json last;location = /.well-known/carddav {return 301 $scheme://$host/nextcloud/remote.php/dav;}location = /.well-known/caldav {return 301 $scheme://$host/nextcloud/remote.php/dav;}location /.well-known/acme-challenge { }location ^~ /nextcloud {# set max upload sizeclient_max_body_size 512M;fastcgi_buffers 64 4K;# Enable gzip but do not remove ETag headersgzip on;gzip_vary on;gzip_comp_level 4;gzip_min_length 256;gzip_proxied expired no-cache no-store private no_last_modified no_etag auth;gzip_types application/atom+xml application/javascript application/json application/ld+json application/manifest+json application/rss+xml application/vnd.geo+json application/vnd.ms-fontobject application/x-font-ttf application/x-web-app-manifest+json application/xhtml+xml application/xml font/opentype image/bmp image/svg+xml image/x-icon text/cache-manifest text/css text/plain text/vcard text/vnd.rim.location.xloc text/vtt text/x-component text/x-cross-domain-policy;# Uncomment if your server is build with the ngx_pagespeed module# This module is currently not supported.#pagespeed off;location /nextcloud {rewrite ^ /nextcloud/index.php$uri;}location ~ ^/nextcloud/(?:build|tests|config|lib|3rdparty|templates|data)/ {deny all;}location ~ ^/nextcloud/(?:\.|autotest|occ|issue|indie|db_|console) {deny all;}location ~ ^/nextcloud/(?:index|remote|public|cron|core/ajax/update|status|ocs/v[12]|updater/.+|ocs-provider/.+)\.php(?:$|/) {fastcgi_split_path_info ^(.+\.php)(/.*)$;include fastcgi_params;fastcgi_param SCRIPT_FILENAME $document_root$fastcgi_script_name;fastcgi_param PATH_INFO $fastcgi_path_info;fastcgi_param HTTPS on;#Avoid sending the security headers twicefastcgi_param modHeadersAvailable true;fastcgi_param front_controller_active true;fastcgi_pass php-handler;fastcgi_intercept_errors on;fastcgi_request_buffering off;}location ~ ^/nextcloud/(?:updater|ocs-provider)(?:$|/) {try_files $uri/ =404;index index.php;}# Adding the cache control header for js and css files# Make sure it is BELOW the PHP blocklocation ~ \.(?:css|js|woff|svg|gif)$ {try_files $uri /nextcloud/index.php$uri$is_args$args;add_header Cache-Control "public, max-age=15778463";# Add headers to serve security related headers (It is intended# to have those duplicated to the ones above)# Before enabling Strict-Transport-Security headers please read# into this topic first.add_header Strict-Transport-Security "max-age=15768000;# includeSubDomains; preload;";add_header X-Content-Type-Options nosniff;add_header X-XSS-Protection "1; mode=block";add_header X-Robots-Tag none;add_header X-Download-Options noopen;add_header X-Permitted-Cross-Domain-Policies none;# Optional: Don't log access to assetsaccess_log off;}location ~ \.(?:png|html|ttf|ico|jpg|jpeg)$ {try_files $uri /nextcloud/index.php$uri$is_args$args;# Optional: Don't log access to other assetsaccess_log off;}}}保存并退出,重启 nginx。
1service nginx restart关于SELinux配置
查看当前SELinux设置:
vim /etc/selinux/conf如果 SELINUX=
enforcing,须运行以下命令:12345678semanage fcontext -a -t httpd_sys_rw_content_t '/usr/share/nginx/html/nextcloud/data(/.*)?'semanage fcontext -a -t httpd_sys_rw_content_t '/usr/share/nginx/html/nextcloud/config(/.*)?'semanage fcontext -a -t httpd_sys_rw_content_t '/usr/share/nginx/html/nextcloud/apps(/.*)?'semanage fcontext -a -t httpd_sys_rw_content_t '/usr/share/nginx/html/nextcloud/assets(/.*)?'semanage fcontext -a -t httpd_sys_rw_content_t '/usr/share/nginx/html/nextcloud/.htaccess'semanage fcontext -a -t httpd_sys_rw_content_t '/usr/share/nginx/html/nextcloud/.user.ini'restorecon -Rv '/usr/share/nginx/html/nextcloud/'这里需要注意的是:如果以后要修改云盘存储路径,同样需要修改SELinux配置。
如果 SELINUX=
disabled,则无须设置。
防火墙配置
如需通过IP或域名访问,须设置防火墙。
|
|
NextCloud 安装配置
用浏览器打开https://[your_server_name]/nextcloud,出现如下页面,恭喜你,说明以上配置成功。
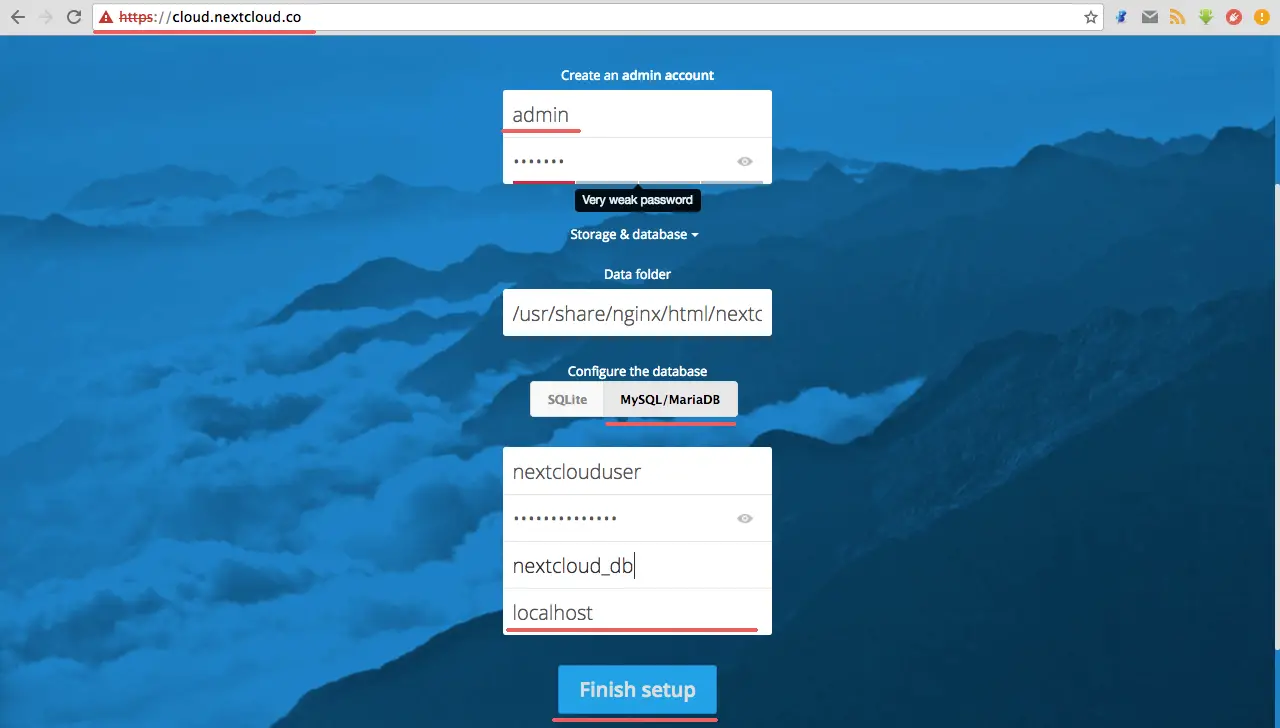
Data folder:默认为 nextcloud/data,亦可进行修改,但必须保证所设置的文件夹的所有者为nginx:nginx。
MySQL/MariaDB:请参考第3步中的设置参数。
点击「Finish setup」,等待几十秒钟,如跳转到如下页面,则说明配置成功。
写在后面的话
无论是NextCloud,OwnCloud还是Seafile,这些软件都为我们搭建网盘提供了比较不错的解决方案,方法大同小异。
近期,真的是掉入了Linux的海洋中,好多东西都是边实验边Google,文章中有不恰当的地方还请大家多多批评指正。
参考文档就不一一列举了,大家都可以在Google中找到相关文章。